Hands On Science Activities
On this page we provide evidence of the children engaging in hands-on science investigations in school (indoors and outdoors) from each of the four strands. See all on our slideshows below
- Living things
- Energy and forces
- Materials
- Environmental awareness and care
Our speakers were...
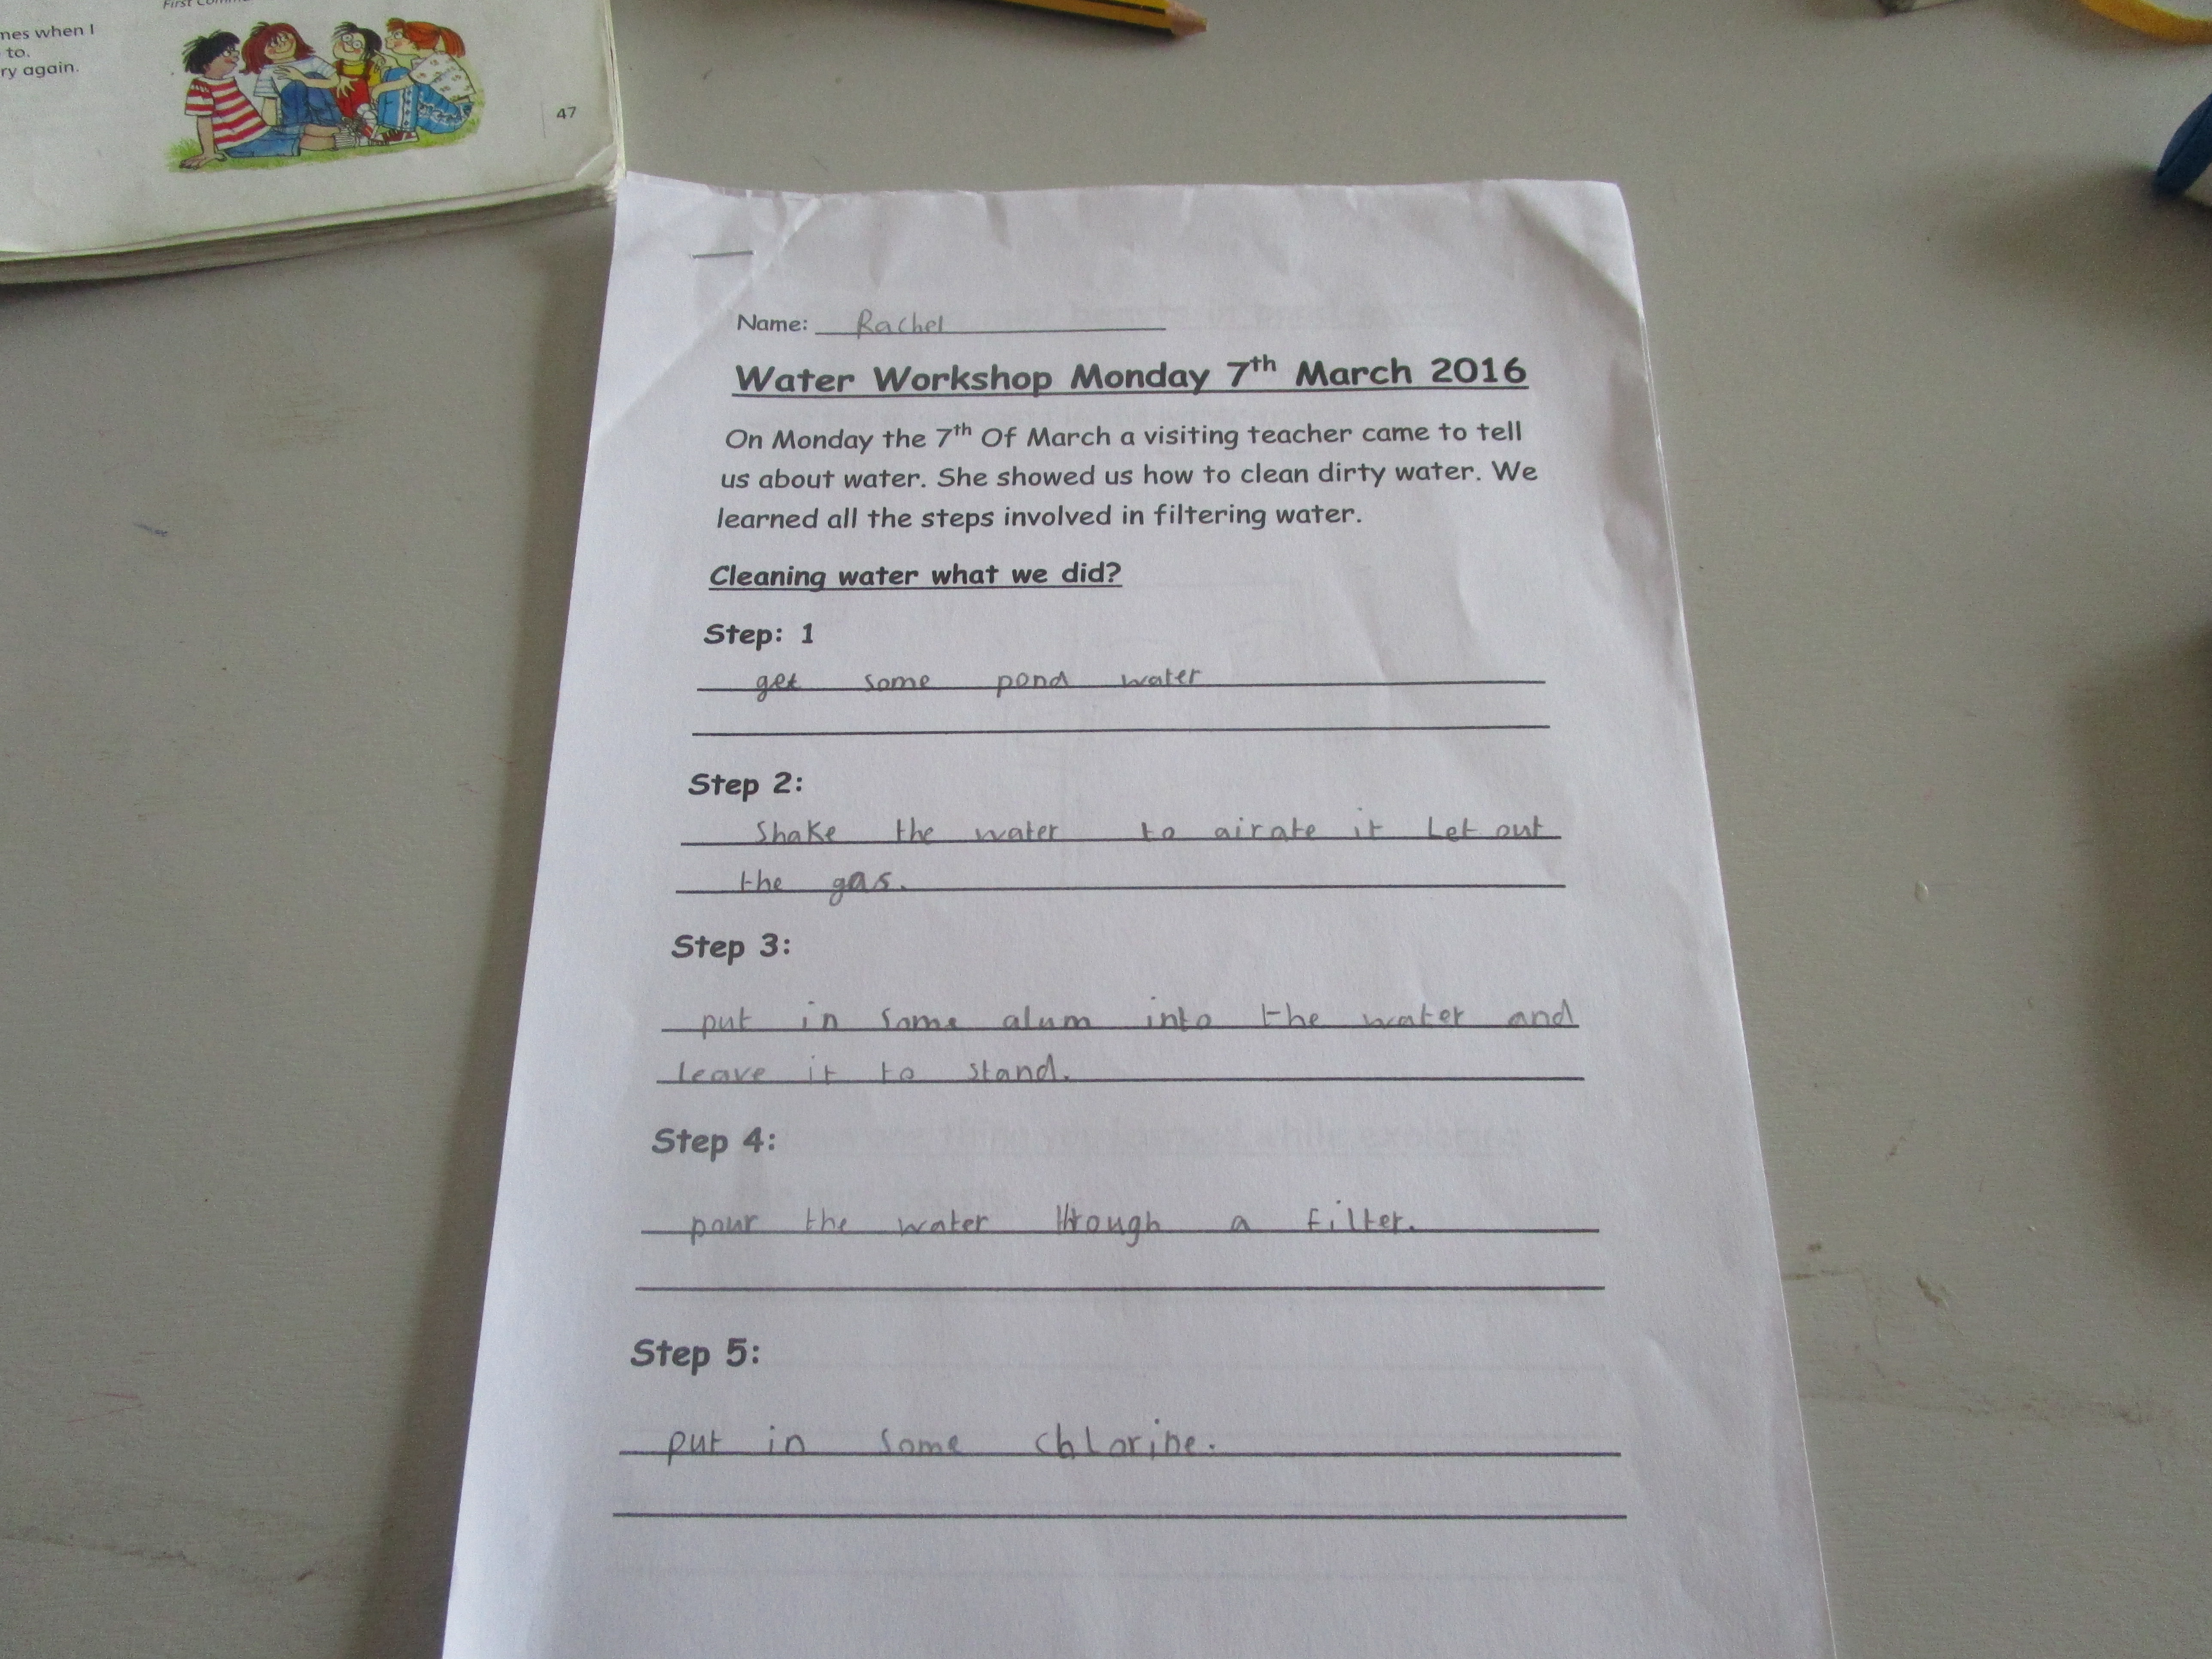
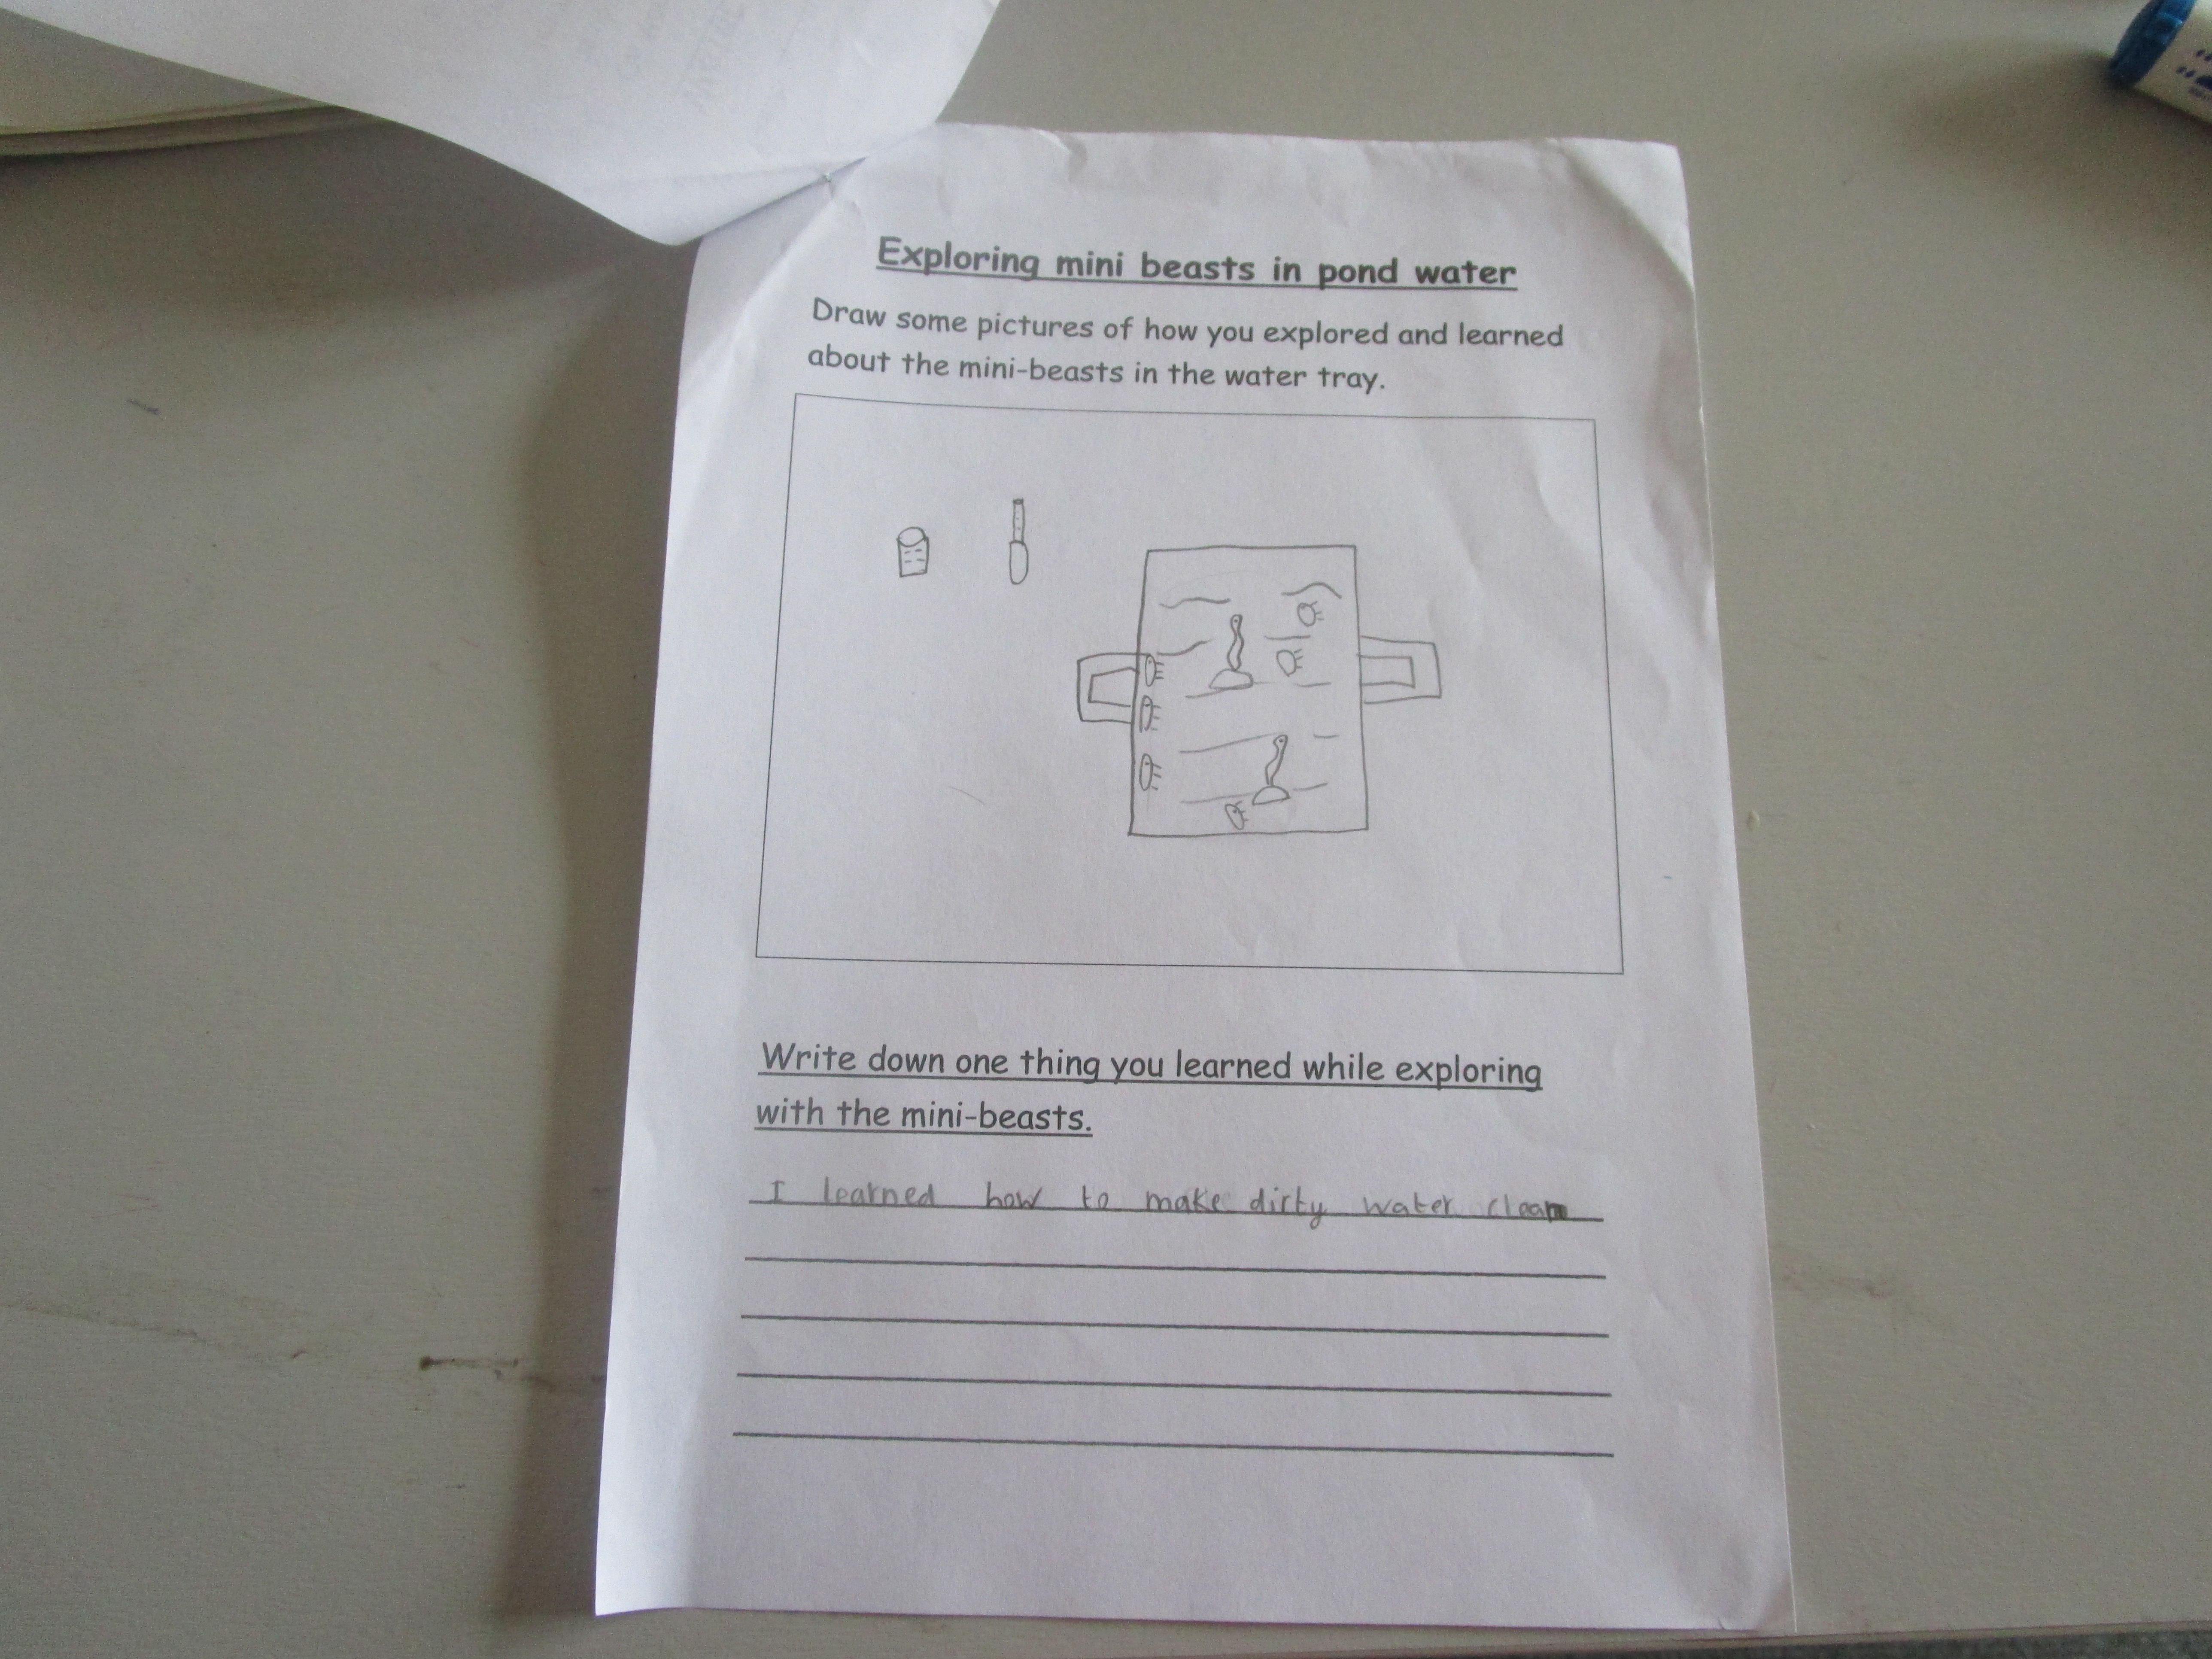
Caitriona came to do a workshop on water. We learned all about the water cycle and we investigated local water quality by looking at the mini-beasts that live in the water.
Sorting and Classifying Materials
Here is the activity sheet used and a report on the lesson.
Chemical Reaction
The class studied volcanoes as part of natural features in Geography lessons. We were intrigued about how volcanoes erupted. To explore the concept we embarked on a project to investigate how hot molten rock is forced out from the earth’s core and forms a conical shaped mountain with craters which allow lava to escape. With this in mind we set about creating our own volcanoes. This was to done to investigate how chemicals react together. This is what we did. What we needed Clay, bread soda, vinegar, spoons. Step 1 Using clay the children designed and their own volcano with a crater on top. They let the volcanoes dry for a couple of days. Step 2 Using a spoon we put some bread soda into the crater in the volcano. Step 3 Each child poured some vinegar into their crate and watched what happened. The vinegar and bread soda reacted and flowed out over the top of the volcano like lava in a real volcano. Conclusion We concluded that there was a chemical reaction between the bread soda and vinegar as they are both opposites. The bread soda is alkaline and the vinegar is an acid and this is what caused them to react and form fizzy foam which expanded over the top of the volcanoes. We wrote about the experience in our science journals and took photos of the activities. Fairy Liquid and Pepper
4th class experiment
|
Exploring with Magnets
The children were given bar magnets and a selection of materials i.e. wood, plastic, metal, copper, paper and fabric.
First they had to explore the poles on the bar magnets. They played with them and each group came up with the same conclusion that like poles repel and opposite poles attract in terms of red ends repel each other, blue ends repel each other and blue and red attract each other. Then it was explained to them that each magnet has a north and south pole. They then explained how opposite poles attract each other and like poles repel each other using the language of poles rather than magnet ends. Each group worked with a selection of materials and predicted what materials would be attracted to the magnets. Firstly they predicted what would happen with each different material before they tried it out. All groups predicted that the magnets would attract the metal objects. They had great fun trying this out. Finally each group were given an enclosed plastic container with iron filings. The pairs explored making the iron filings stand, move and created shapes using the magnets and filings. They concluded that iron filings are attracted to magnets. We will continue exploring magnets at a later date and we hope to make a simple magnetic car that we can move using a hand held magnet. Magnetic Car
Designing and making a magnetic car
After exploring with magnets our next task was to design and make a magnetic car that could be moved using magnetic pull. Step 1 The children collected suitable reusable boxes to use as cars. The local chemist gave us a selection of old tablet boxes which we turned inside out so that the surface of the car was clear. Step 2 The children designed and coloured the car to their own design. Step 3 Through an opening at one end of the box we inserted a small circular magnet and secured it to the floor of the car (magnet side down) then we sealed the open end of the vehicle. Step 4 Using a bar magnet each child tested pulling their car through various surfaces i.e. wood, paper, cardboard and fabric. The car moved best through the cardboard sheet. Conclusion: The children were very successful with this activity. The magnetic cars worked well and we achieved the purpose of the lesson i.e. to move a small magnetic car using magnets on any surface. We concluded that the car moved best when being pulled through the cardboard. We felt we would need a much stronger magnet to move the cars through the thick table top. The paper was not that suitable as it was very thin and didn’t hold the cars very securely. Celery and Dye

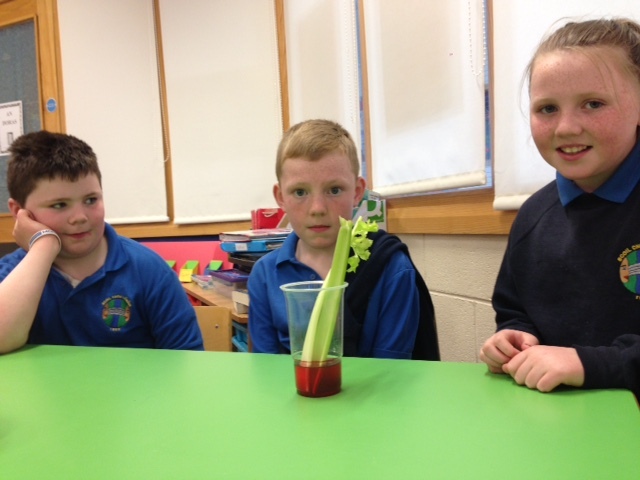
4th class experimented with dye and celery - they were hoping to see the celery change colour - but it didn't work!!
| ||||||||||
Forensics with Garda Fintan
Who stole the glass? Can we work it out using forensics?
2nd and 3rd class had the pleasure of a visit from our local Garda who explained to the class all about his work as a Garda. He spent time talking to the children and showing then the items he uses in his everyday work. All the children got to try on a Garda hat and bullet proof vest. They also saw his baton and handcuffs. During the talk one of the children attempted to steal his drinking glass but they were interrupted. Garda Fintan quickly set about finding out who tried to steal his glass. He lined up three suspects who were acting suspiciously around the area where the glass was sitting. What Garda Fintan did? After rounding up the suspects he proceeded to take their finger prints. This was a new experience in our classroom. Step 1 Garda Fintan carefully took his glass being careful not to disturb the fingerprints on the glass. He then used his special kit to brush iron filings on the glass which showed up the fingerprints. He took a copy of these. Stage 2 Garda Fintan then called his suspects and using a special ink pad he took their finger prints. He placed their finger prints on a sheet with their name on it and recorded their details. Stage 3 He then went off and compared the prints on the glass to each suspect’s prints. Immediately he found a match. A most unexpected thief was caught red handed. Garda Fintan explained that this was the way fingerprints were taken in the past. He showed the children the materials he used to work out who did the crime. He explained that this is part of forensic science. The Pigeon
|
|
The feral pigeon
Pigeons are familiar to everyone whether they live in cities and towns or in rural areas. There are two species of pigeon – the feral pigeon and the wood pigeon. The feral pigeon can be found mainly in towns and cities. It lives in flocks and is the species that comes to feed when bread is scattered in the park or square. The wood pigeon Wood pigeons are larger than the feral pigeons with a distinctive call – “coo-coooo-coo coo-coo”Pigeons nest in derelict buildings and warehouses. Wood pigeons build solitary, large untidy nests of sticks in trees, especially in trees along the street or in hedgerow trees in rural areas. They lay two white eggs which are incubated by both parents for 19 days. The young birds fledge after 33 days and are taught by their parents to find food such as seeds, berries and buds. Pigeons are strictly vegetarians they feed their young with a type of milk that they produce in their crop. The crop is a storage area for food at the base of their throat. Pigeons are very fond of green crops and like to eat the farmer’s cabbage early in the morning when no one is around. Pigeons were used during the war to carry messages in small tubes attached to their legs. 
Materials and change - Making lava lamps in Mr Treanor's Room In this lesson the class investigated materials and change. We set an objective of creating our own lava lamps by using various materials to replicate them.
We used clear bottles, vegetable-oil, water, food colouring and alka-seltzer to create the effect of a lava lamp. Firstly we ¼ filled bottles with water. We then ¾ filled them with vegetable oil. The children discussed how the liquids did not mix and how oil rises to the top as it is less dense than water. We then added food colouring and the children again observed how it sank to the bottom of the bottle and mixed with the water. We then broke up the alka-seltzer tablets and the children placed them in the bottles and observed how the chemical reaction of the tablets against the water erupted, creating a fizz effect that blew coloured bubbles through the mix creating a lava lamp effect. Floating and Sinking
Mrs Mc Ginn's room investigated floating and sinking...

Here's our slideshow....
|
The Swallow
Swallows are Irish birds because they are born here in summer. Their nests are made from mud and lined with feathers. Their cup-shaped nests are always built indoors in sheds and barns.
The female lays three to six white eggs with red-brown speckles and they hatch after fifteen days. The nestlings are fed by both parents and are able to fly in twenty more days. When they leave the nest they don’t return again. Swallows are carnivores. They feed on aerial insects which they catch in their large gaping mouths. They cannot eat anything else so as the days shorten in September they gather in colonies on telegraph wires and suddenly fly south to Africa to spend the winter. Irish swallows spend the winter in South Africa where it is warm enough to have sufficient aerial insects to feed them. When the days lengthen in March they set out again to return to Ireland. . 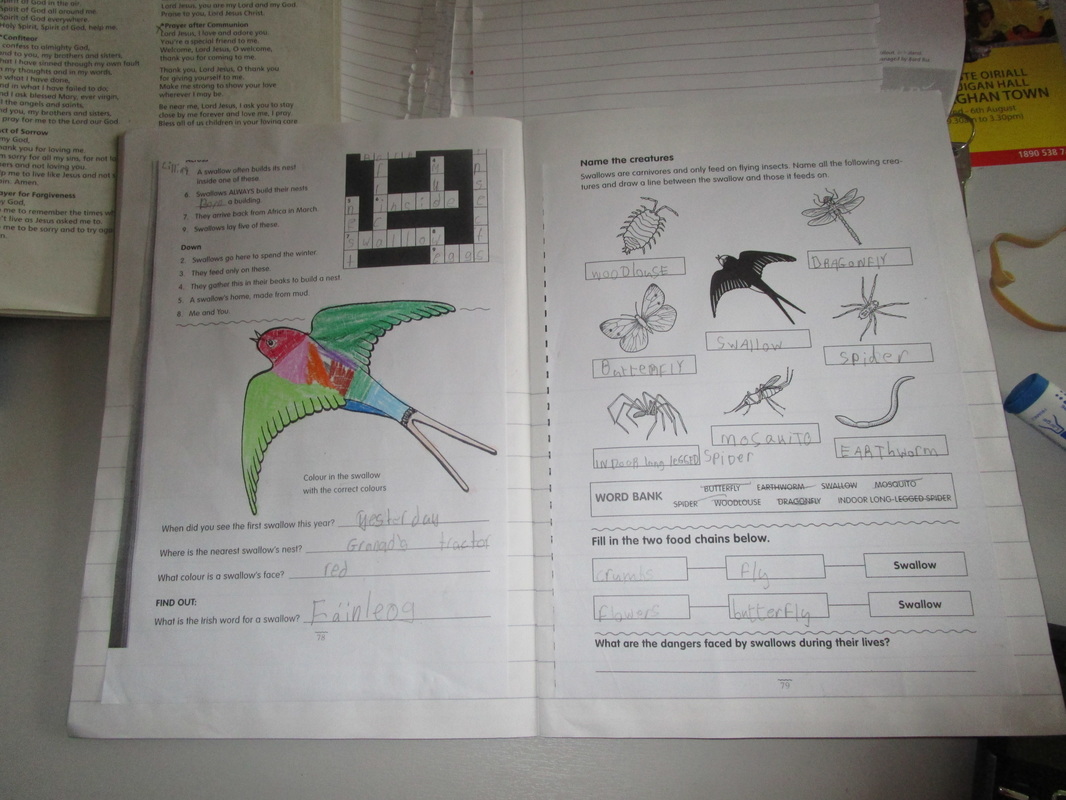
Energy and Forces - Magnetism - Mr Treanor's room.
In this lesson the children explored energy and forces with a focus on magnetism. The children discussed magnets and how they are used and where they are found. They then explored the terminology of ‘repel’ and ‘attraction’. The children explored ‘North’ and ‘South’ poles and how opposites attract and same poles repel.They explored the effects magnets have on metal materials.
We then set up a course where children had to move magnets through a course without touching them. The children had races and had to move the magnets by using other magnets to repel them further down the line or use the other ‘pole’ to attract them towards the finish line. Environmental Awareness and Care - Green Schools - WaterThis year we were working on the Water theme for our third Green Schools flag. We have just been told that we have been successful and we will be collecting our flag on 25th May in Dublin. All classes worked hard on the seven steps to achieve the flag.
Planting Sunflowers
Junior and Senior infants planted sunflower seeds in pots. Here's a slideshow...
|
Static Electricity (4th Class)
|
Our School Garden
|
Learning about birds and minibeasts at Baronscourt |
|
Our school garden is up and running again! We planted cabbage, lettuce, strawberries and parsley in our raised beds.
We are going to add scallions and rhubarb. We tidied up or herb garden - the mint had taken it over but it smells great! Thank you to Silverhill Farms for donating the plants! Second and third class are preparing plants and seeds for summer gardening. They learned the life cycle of a sunflower and discussed all the conditions necessary for plants to grow. |
We visited Baronscourt near Omagh again this year. It is a big estate with woodlands, rivers and lakes.
We did a fieldtrip and activities involving birds and mini-beasts. We identified different types of mini-beasts and we learned about the sounds that different birds make. We also looked at the buds on the trees, spring flowers and the lambs in the fields - new life in spring. We compared pine cones and we discovered one that had been eaten all the way round - a sign that it had been eaten by a red squirrel. We named some trees - ash, oak, sycamore, beech, spruce. We had a rare treat in that we saw giant sequoia - they are massive! We felt the bark and learned that it is spongy and this is why they are not destroyed by forest fires in America. We looked at the bark of other trees as well and found that some are rough and scaly. We were not allowed to pick wild flowers such as primroses as they are protected. In the distance the farmers and the gardeners were very busy preparing land for crops and looking after new lambs and calves. |